Introduction
I have yet to find a quick easy to read document that details how to remove an IP from various blacklists. So, here is my attempt to correct all of that and provide a complete list of where to go and who to contact to take care of blacklist removal.
Instructions
First off, there are several items that may need to be addressed before attempting blacklist removal. In my experience the most common causes for being blacklisted, or having mail rejected, in the first place are: open relay, a virus on the network, and no PTR record.
You will need to ensure that any problems that probably resulted in your blacklisting are taken care of before requesting removal. If they are not, you will more than likely be listed again in the near future and the removal process may then get more complicated.
Typically, my first step is to check the results of the spam database check on DNSStuff.com. Simply go to their site and place the IP address of the mail server in your organization. If you are not sure what the outside IP address of your mail server is, then login to it and go to IPChicken.com. You will then see your IP address listed on the page. Copy and paste it in the “Spam Database Lookup” box under IP Tools and then select Lookup. You should then see the results begin to populate on the screen. Anything in red is bad and will need to be addressed. DNSStuff.com provides links to each of these “public” blacklists that contain removal instructions.
Reverse PTR
AOL and many other mail services require that the IP address of your mail server has a Reverse PTR record associated with it. It does not necessarily have to match the MX record of your mail server, but I recommend that it does.
To create a Reverse PTR record you must contact your ISP. Even though this is a DNS related change, it can only be made by your Internet Service Provider. You will need to contact them with a request associating your server IP address with a valid DNS name.
Example: 66.23.2.213 points to mail.yourdomain.com
Helpful Hint: If Qwest is your Internet Service Provider (ISP), I have found that sending this Reverse PTR request to dns-admin@qwest.ip.net from and email account of the domain that is being modified generally results in the quickest turnaround. If your company uses a different ISP you will need to contact them over the phone and make this request.
Manual Removal
Once the problem that originally got your IP listed has been corrected you will generally see the problems go away. However, I have seen lingering problems for weeks. To speed up this process you may want to visit or perform the following if you are having issues with the following companies. These companies may hold “private” blacklists that are not made available to the public.
AOL and CompuServe
This is not so much a “removal”, but an application to be whitelisted. You must meet all of the requirement to be accepted and send at least 100 messages per month to AOL recipients. Generally, once you have cleaned up the original blacklisting problem, this will not be necessary.
Web Page: http://postmaster.aol.com/whitelist/whitelist_guides.html
Yahoo!
You may go to the following web address or send an email to Yahoo! with your IP and the removal request.
Web Page: http://help.yahoo.com/l/us/yahoo/mail/original/abuse/index.html
Email: abuse-admin@cc.yahoo-inc.com
Road Runner
You may use this link to see if you are blocked. Enter in your IP address of your mail server and click submit.
Web Page: http://security.rr.com/amIBlockedByRR.htm
Email: removal@security.rr.com
NetZero, Juno, and Bluelight
Follow this link and fill out their form.
Web Page: http://www.unitedonline.net/postmaster/blocked.html
AT&T and SBC
Send an email to the following address with your IP address and your request.
Email: abuse_rbl@abuse-att.net
Comcast
Send an email to the following address with your IP address and your removal request.
Email: blacklist_comcastnet@cable.comcast.com
Cox
Send an email to the following address with your IP address and your removal request.
Email: unblock.requests@cox.net
Once you have followed these steps, you should begin to see your mail flow improve. If it doesn’t, you may want to check DNSStuff.com again to see if you are listed on any “public” blacklists. If you are listed, then follow their procedures to get yourself removed.
Conclusion
Blacklists are very useful when combating SPAM. However, if you find yourself on the wrong end of a blacklist it may take a great deal of effort and time to get off. Follow these procedures and monitor your IP address often. Ensure that your server is not set as an open relay, you have a valid PTR record, and that you have up-to-date antivirus on every computer that shares your internet connection.
Wednesday, September 12, 2007
Blacklist Removal
Monday, September 10, 2007
Exchange 2003 Recovery Storage Group
Introduction
As I run into various problems and/or tasks on the job site, I like to document some of the things I have learned. This essentially is why this blog exists. My hope is that by posting a comprehensive "how to" of common tasks, that we IT Professionals run into on a daily basis, I just might help someone solve a problem a little bit faster in the future.
Today I will touch on some of the things I learned recently using the Recovery Storage Group option available in Exchange 2003. I have worked on Exchange 2003 for many years and have actually never had to perform this procedure until recently. My primary means of backup was through a brick-level backup agent used with many of the popular backup solutions. However, due to time constraints with the current backup window a client of mine was performing Information Store backups only. A user then complained that a number of his folders had gone missing. The usual check to the Deleted Items folder and also the "secret" server-side Deleted Items folder proved unsuccessful. We had good backups using Backup Exec 10.0 of the Information Store, so now was the time to use the Recovery Storage Group option.
Instructions
The Recovery Storage Group is actually quite simple to setup, however, throughout the whole process I was worried about whether I was going to interrupt the live environment and take down the email system. If everything is done correctly, this should not happen. Also, throughout the process I was always worried that I was somehow going to "overwrite" the current database with my backup instead of sending the backup to the Recovery Storage Group.
This Microsoft KB Article explains explains just about everything you need to know about the Recovery Storage Group (http://support.microsoft.com/kb/824126). For simplicity, we will say that the Recovery Storage Group is more of a staging area. Clients cannot connect to it directly. You cannot send or receive mail with it. It is simply used to mount and access a restored database.
Creating the Recovery Storage Group is actually quite simple. First, go into the Exchange System Manager and drill down to Adminstrative Groups > First Administrative Group > Servers > YourServerName. Right-click on the server and select New > Recovery Storage Group.

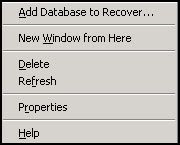
Give your group a name and then you are ready to add the database you are looking to recover. You can do this by right-clicking on the newly created storage group and selecting the Add Database to Recover... option.
 Next you will be given a window with the databases that are available for recovery. Many of you will only see a single database. Select this database and continue on. Also, you will be prompted in this process to name the location where the database will reside. Select a folder that has enough space to hold the newly restored database. In my case, the currently mounted live database was about 120GB. Fortunately, I had a local disk with about 150GB free, so I elected to place the database in a folder on this drive. Make sure you have enough disk space or the restore operation will fail.
Now we are ready to move onto the restore portion from the backup software. This particular client was running Backup Exec 10.0. I created a job to restore the database from a date that I knew had the data the client wanted. My main concern through all of this was the fact that I never was able to "tell" Backup Exec to restore or redirect the database restore to the Recovery Storage Group. This was because you don't need to. When the RSG is created, the Exchange backup API's will "stand in" and redirect the backup to the Recovery Storage Group. Also, if you are concerned with overwriting the live production database, make sure the following option is checked by viewing the Properties of the Mailbox Store in question. Under the Database tab make sure the option of "This database can be overwritten by a restore" is not checked.
Note: As I attempted to perform this restore I received several errors from my backup job. I ensured that everything was setup up properly and it was. However, despite repeated efforts to start the restore I was unsuccessful. It wasn't until I started an Information Store backup that I was able to perform the restore. I simply cancelled the job immediately after I determined that it was properly backing up Exchange. I did not investigate this any further, but I want to mention this to anyone else that may be experiencing the same problem. There may have been issues with Backup Exec trying to communicate with the newly created Storage Group. By backing up the existing Information Store, the Exchange server and or Backup Exec server may have aligned itself properly to allow the restore to job to start running.
 Now for the backup job itself. Since I was performing this restore after hours, I did not check the "Commit After Restore Completes" option in Backup Exec.
 I left for the night and came back the next morning unable to mount the newly restored database. The errors I received were the following.
Event Type: ErrorEvent
Source: ESEEvent
Category: Logging/Recovery
Event ID: 619
Date: 9/10/2007
Time: 12:43:58 PM
User: N/A
Computer: SERVERNAME
Description:Information Store (3020) Recovery Storage Group: Attempted to attach database 'M:\Exchdata\Recovery\Mailbox Store.edb' but it is a database restored from a backup set on which hard recovery was not started or did not complete successfully.
Event Type: ErrorEvent
Source: MSExchangeISEvent
Category: General
Event ID: 9519
Date: 9/10/2007
Time: 12:43:58 PM
User: N/A
Computer: SERVERNAME
Description:Error 0xfffffde0 starting database "Recovery Storage Group\Mailbox Store" on the Microsoft Exchange Information Store.
This was simply due to the fact that the hard recovery had not been completed. Backup Exec will do this for you if the above mentioned option is selected. If it was not selected you can manually run this by using the eseutil. A KB article written by Symantec explains this in much greater detail (http://seer.support.veritas.com/docs/245494.htm).
My command looked like the following (with the quotes):
Eseutil /cc "C:\Temp\First Storage Group"
I was now able to use ExMerge to access the old user data. Simply download and start the program. You will be prompted to choose a domain controller to connect to and then soon you will see a scree to select which storage group you would like to connect to. Once selected, you can dump out the mailbox information into a PST and then use Outlook to restore what you need.

Once you are done, it is best practice to delete and remove the Recovery Storage Group.
Conclusion
With a few simple steps and some patience, it is quite simple to mount a backed up database through a restore to the RSG. In some organizations this may be your only form of backup. If your organization has the tape size and time window to do it, then I recommend performing a "brick-level" backup of Exchange. Restores of individual items and mailboxes can be completed much quicker and easier.
